

One of the most exciting tasks in planning your wedding is letting your guests know about all the details of your big day. Today, there are many options for sending invitations – but none are as special as a printed invitation that can showcase your wedding theme and colours, include photos and beautiful images and provide a lasting keepsake. This handy guide answers your questions about how to prepare your wedding invitations for mailing.
Consider printing and mailing your invitations
Before you opt to send e-invitations, consider mailing printed invitations instead. Printed invitations are truly special. They can be customized to highlight your personal style and showcase your wedding theme and colours. You can even include photos and beautiful images – making your invitations a wonderful keepsake for your guests.
Receiving an invitation in the mail will make your guests feel special. It requires a bit more effort on your part, but your guests will appreciate the sentiment more as well.
Choose the right look and feel for you
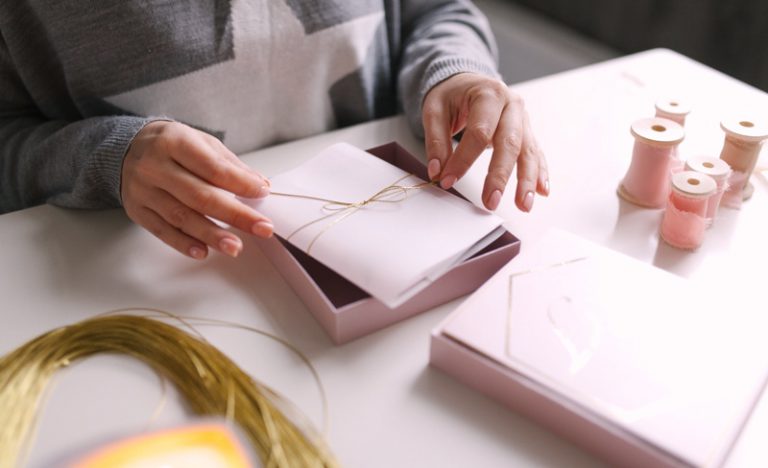
Don’t just go with what’s on special – your wedding invitation choices are important. They’re an opportunity to showcase your taste and style and reflect the theme of your event. If you’re planning an elegant affair, think heavy paper stock with embossed details, lined envelopes and a separate inner envelope. If your wedding day will be less formal, you can showcase its relaxed tone with creative print and paper choices. For example, using a postcard for replies lets your guests know that your event is on the casual side. If you have the drive to DIY your invitations, you can really add a personal touch. Visit craft and stationery stores or shop online for paper and envelopes. Once your have your supplies, prepare to be amazed by the countless invitation printing templates that are available online.
Plan your budget — and don’t forget the stamps
Budgeting is critical when it comes to wedding invitations. Printing costs can vary widely – from as little as $1 per invite to as much as $30 for high-end options. What you choose will also impact the cost of postage for your invitations. This is because the weight and size of your invitations, and how many you’re sending to the U.S. and overseas, factors into your final postage costs heavily. If your invitations will include inserts – such as reply cards and envelopes, maps, reception cards etc. – then the weight will be heftier, and the cost of postage will increase.
To help you budget and plan wisely, we’ve outlined some invitation tips below to guide you in the process of planning and sending your invitations.
Our best wedding invitation tips
Know when to send
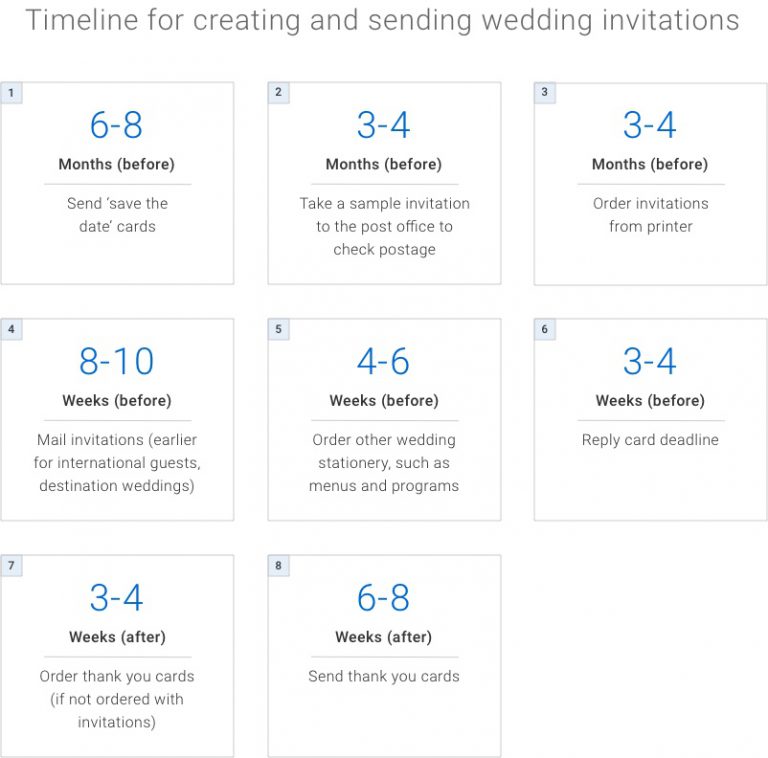
It’s important to have your invitations in the mail at least eight weeks before the ceremony, with an RSVP cut-off of three to four weeks prior to the wedding. Thank-you cards should be mailed two weeks after the bridal shower and six to eight weeks after the wedding.
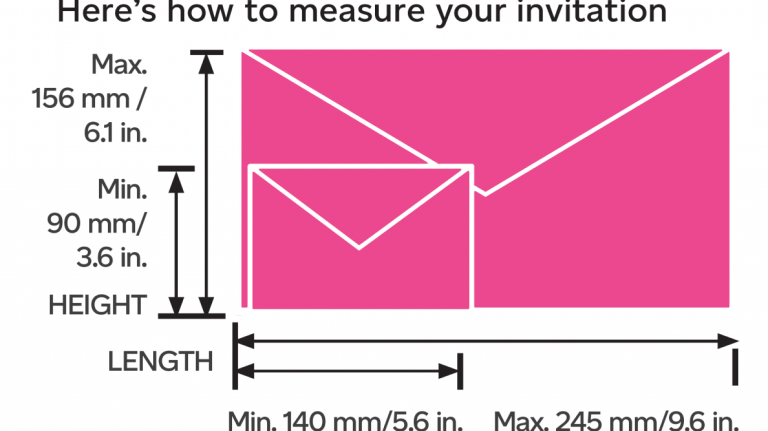
Size and shape matters
The size and shape of your invitations impacts postage costs.
To use a single domestic stamp on mail within Canada, your invitation must be:
- Rectangular or square,
- Within standard measurements,
- No more than 5 mm thick and 30 g.
For invitations weighing between 31 g and 100 g, single stamps are available at a higher rate. Square invitations only require regular postage when mailed within Canada. They must be between 140 mm x 140 mm to a maximum of 156 mm x 156 mm.
Use the right rate
When it comes to sending letter mail within Canada, you can usually just use your favourite domestic stamp – depending on the weight and size of your letter. If you intend to send letter mail to the U.S. or internationally, you can use multiple domestic stamps on your envelopes in order to reach the right rate. Alternatively, you can purchase U.S. or international stamps from Canada Post. Rectangular invitations mailed to other countries will require additional stamps. Learn more about Canada Post postage rates here.
Select a beautiful stamp
Your choice of postage is a nice way to personalize your wedding invitations. Canada Post has many beautiful stamps to choose from. Visit our online store to pick one that will complement or match your wedding theme and show off personal style.
Include stamps for your reply/RSVP cards
It’s nice to pre-stamp your reply/RSVP cards – it’s a courtesy your wedding guests will appreciate. If you are inviting guests from abroad, you may be able to pre-stamp reply cards for U.S. and international guests. To do so, visit the website for each country’s postal service to purchase the right postage. Please note that you can’t use Canadian stamps as postage on mail replies from another country. If including local postage with your international guests’ reply cards feels overwhelming, don’t feel pressured to do so.
When in doubt, check with your local post office
If you have a complete sample invitation, take it to your local post office to be weighed and measured. They’ll be able to tell you the exact cost of postage. Using incorrect postage will result in your invitations being returned to you.

Factor other wedding mail into your budget
If you intend to send additional pieces – such as engagement announcements or party invitations, “save the date” cards and bridal shower or Jack-and-Jill party invites – be sure to factor those mailings into your overall budget.
Say thank you
While wedding invitations are probably the most exciting mailing for you to prepare, thank-you cards are just as important. A thoughtful hand-written note that mentions the guest’s gift, and your appreciation of them and their generosity, will go a long way. If the guest gave you money, don’t specify the amount.
You can really personalize thank-you cards. Consider mailing postage-paid cards or postcards printed with a photo of the two of you opening gifts or holding a thank you banner.
Congratulations on your wedding! We hope that these tips help you perfectly plan and mail your invitations.