Please note: Check the Adobe website periodically to make sure you have the latest template version.
Browse this topic
Self-mailer requirements
Self-mailers must meet the requirements outlined on this page.
- The Adobe Illustrator™ (AI) template is driven by layers. In AI, go to WindowLayers if the layers palette is not already displayed. See template features below to learn about the different layers.
- Click on the eye icon of a layer to show or hide the layer.
- Save the file or export it to any preferred file-type after you make edits or layer changes.
- Your artwork is now ready for your next mailing campaign.
.svg "A screenshot of the different layers in Adobe Illustrator")
- Indicia layers. A variety of postal indicia are included on separate layers. Select the appropriate layer or indicia required for your mailing.
- Destination address layer and return address layer. You can edit the addresses on the destination address layer and return address layer as required.
- Address and postage zones layer. The address and postage zones layer outlines the areas set out for the placement of addresses and postage. The address must appear in the areas outlined.
- Graphics and quiet zones layer. The graphics and quiet zones layer outlines the areas set out for the placement of text or images/graphics and quiet zones which must be kept free of graphics and text (other than address information).
- Graphics sample layer. The graphic sample layer has an example of graphics/text and colours applied to the mail item.
Please note:
- We developed the Machineable Mail Advisor tool to help you design envelopes, self-mailers, and cards that meet our Machineable specifications. By delineating the areas that are reserved for addressing and postage, the tool is also meant to highlight and give you the opportunity to leverage the areas available for customization. The tool is based on our Machineable Mail designing module and outlines the basic design requirements for Machineable items.
- For complete requirements, you must consult the applicable customer guide for your chosen service.
- This tool allows you to download a mail template and then modify certain elements using the design software of your choice. But, if you alter the size or layout of a template, it may render the item out of specification, potentially disqualifying it from the expected services or applicable prices. Such modifications may also impact envelope/card manufacturing or postage costs. It’s your responsibility to make sure that final printed envelopes, self-mailers, or cards meet all requirements.
- We’ve made reasonable efforts to make sure that the Machineable Mail advisor is accurate at the time of release but we accept no liability for any potential inaccuracies or omissions.
- ™ Trademark of Adobe Systems Inc.
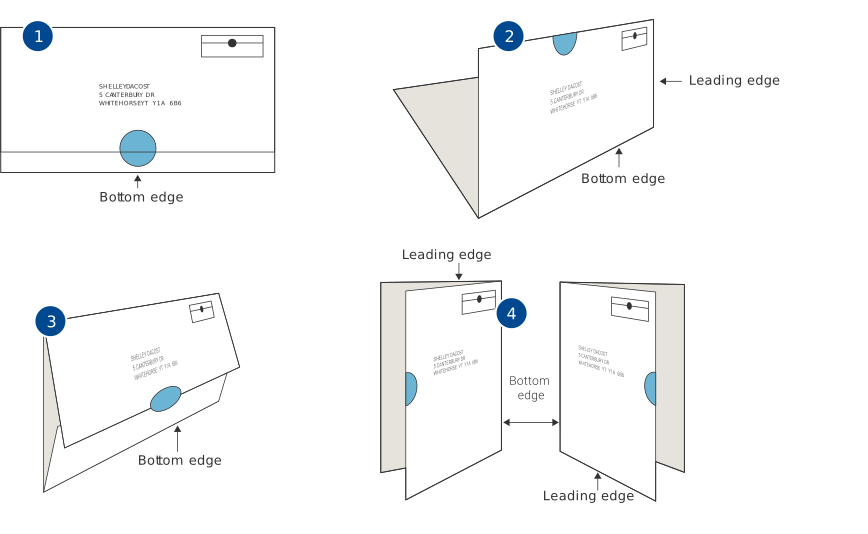
Sealing locations (address side)
You can seal self-mailers in several locations on the address side:
- Where the two folds meet in the middle
- On the top, opposite the bottom edge
- Similar to the first example, where the two folds meet in the middle
- On the right or left, opposite the bottom edge
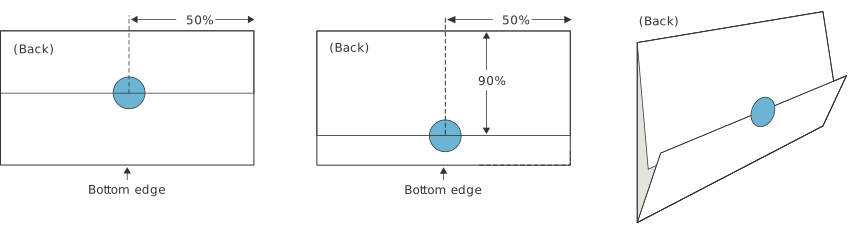
Sealing locations (non-address side)
You can also seal self-mailers on the non-address side where the two folds meet in the middle.
Please note: The clip seal on the back of the item can be up to 90% from the top.
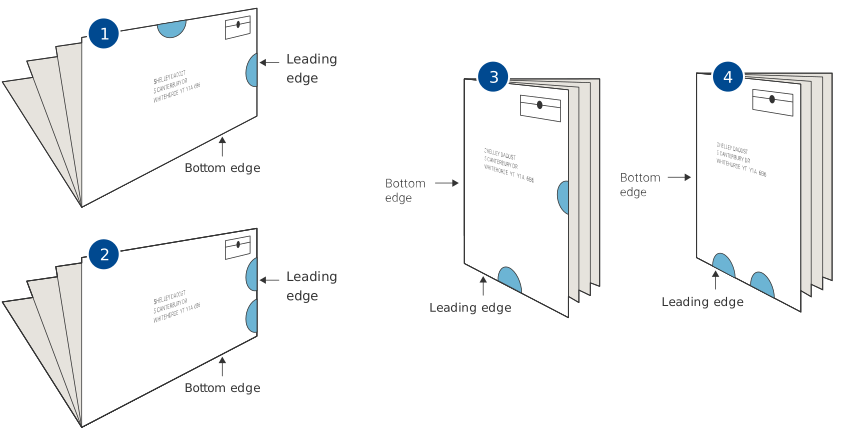
You can seal multiple sheet self-mailers/mini-catalogues in several locations:
- On the leading edge and opposite the bottom edge
- On the right, on the leading edge
- Where the self-maileropens and on the leading edge
- On the leading edge at the bottom
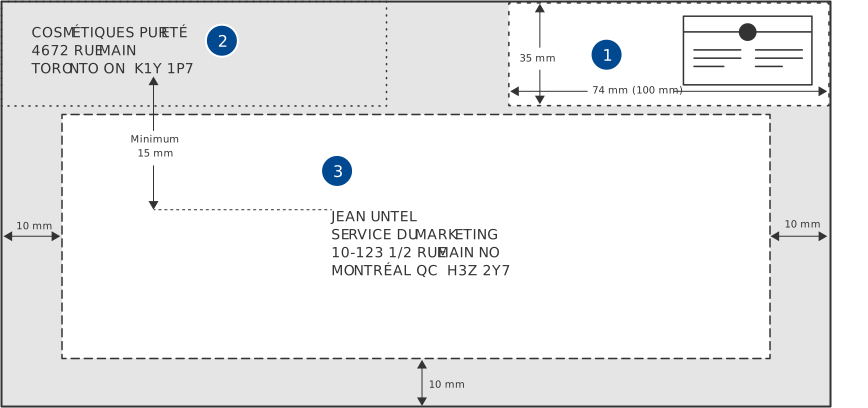
Layer 1
- Postage zone. The postage zone is found in the top right of the self-mailer. The postage zone itself must be no larger than 35 mm from the top and 74 mm from the right edge of the self-mailer. If using a postage meter, the postage zone is 35 mm by 100 mm.
- Return address zone. The return address zone is found in the top left of the self-mailer.
- Destination address zone. The destination address zone is found 35 mm down from the top, 10 mm from the left side of the self-mailer, 10 mm from the bottom, and 10 mm from the right side of the self-mailer. The destination address is also found 15 mm down from the return address.
Layer 2
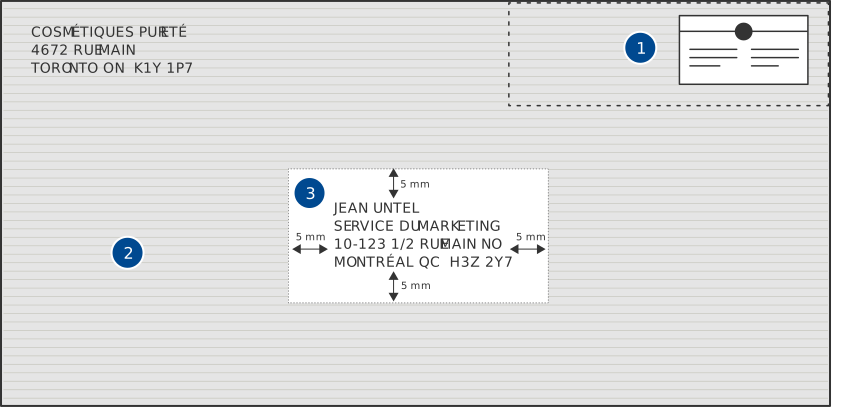
- Postage zone. The postage zone is found in the top right of the self-mailer. Postage must be approximately 35 mm from the top of the self-mailer. The postage zone itself is to be no longer than 100 mm. If using a postage meter, the postage zone is 35 mm by 100 mm.
- Graphics zone. You can place graphics anywhere outside the quiet zone.
- Quiet zone. The quiet zone is found around the address on the self-mailer. The quiet zone is to be at least 5 mm from the top of the address, at least 5 mm from the right of the address, at least 5 mm from the bottom of the address and 5 mm from the left of the address.
Layer 3
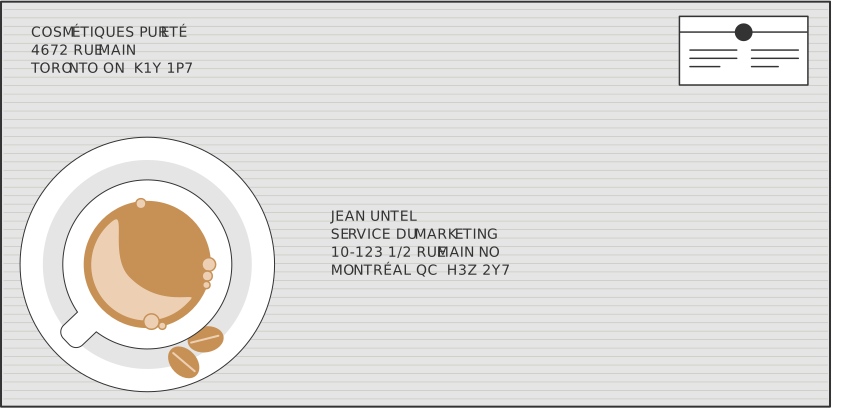
An example of a horizontal self-mailer with graphic.
Layer 1
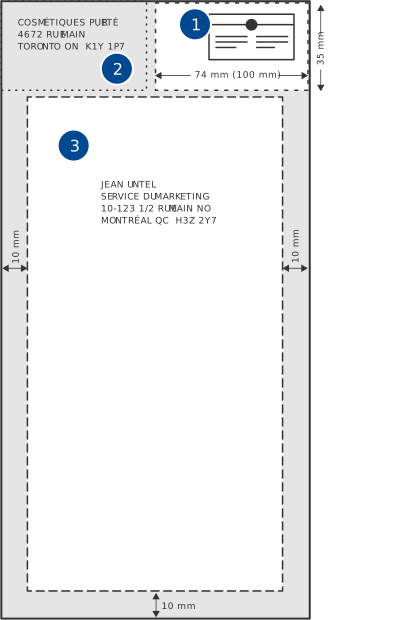
- Postage zone. The postage zone is found in the top right of the self-mailer. The postage zone itself must be no larger than 35 mm from the top and 74 mm from the right edge of the self-mailer. If using a postage meter, the postage zone is 35 mm by 100 mm.
- Return address zone. The return address zone is found in the top left of the self-mailer.
- Destination address zone. The destination address zone is found 35 mm down from the top, 10 mm from the left side of the self-mailer, 10 mm from the bottom, and 10 mm from the right side of the self-mailer.
Layer 2
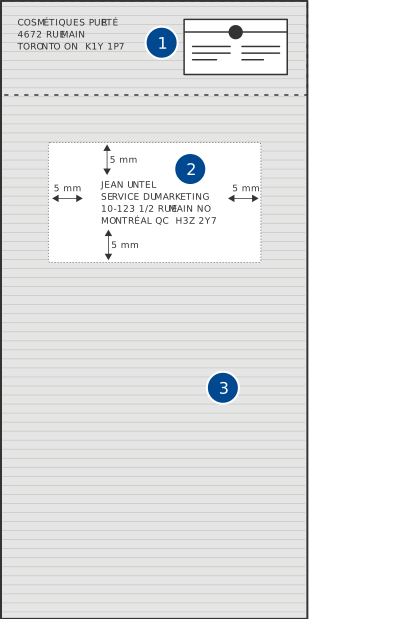
- Return address zone. The return address zone is found in the top left of the self-mailer.
- Quiet zone. The quiet zone is found around the address on the self-mailer. The quiet zone is to be at least 5 mm from the top of the address, at least 5 mm from the right of the address, at least 5 mm from the bottom of the address and 5 mm from the left of the address.
- Graphics zone. You can place graphics anywhere outside the quiet zone.
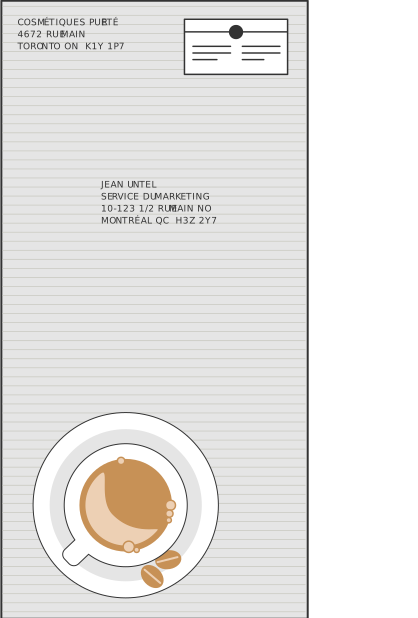
Layer 3
An example of a vertical self-mailer with graphic.