Run a Sample Request
You can access Canada Post web services without writing any code. Test connectivity and experience the inputs and output responses from our web services.
View instructions for running the sample request using one of the following:
- soapUI – a downloadable utility that runs both SOAP and REST requests. We provide the ready-to-run projects for soapUI.
- RESTClient add-on for Firefox – install the free add-on and run requests from a browser (REST only).
Run a Sample Request Using soapUI
Download and install the latest soapUI release.
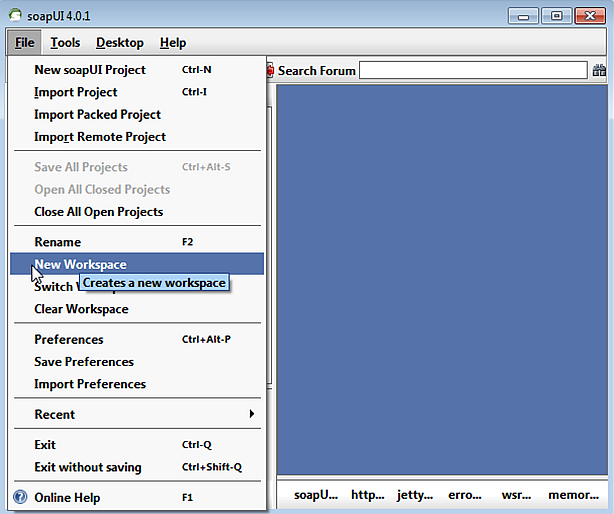
- Start soapUI. From the File menu, select New Workspace.
- Enter a name for the workspace.
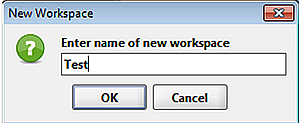
- Choose a location to save the workspace XML file.

- From the list below, download and save the project for the Canada Post web service you are interested in testing. (The All file has all web service test projects.) In the example that we document on this page, we use the Rating project.
Project Category REST Test Project SOAP Test Project ALL
Artifact (get pdf files)
Rating
Contract Shipping
Non-Contract Shipping
Tracking
Find a Post Office
Pickup Availability
Returns
Merchant Registration
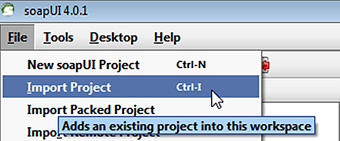
- From the File menu, select Import Project and navigate to the project that you downloaded in the previous step.
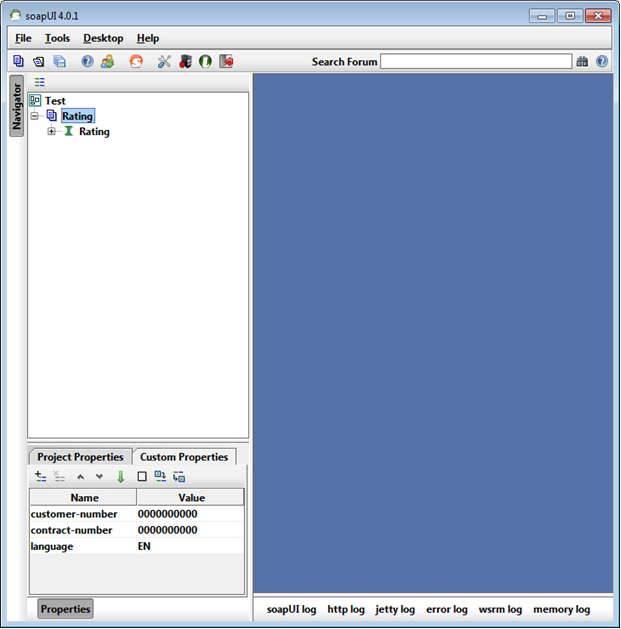
- Select the Custom Properties tab. Double-click the Value cell to enter your customer-specific information. If you do not have a Canada Post contract number, you can leave it as zeroes.
- In the left pane, double-click the hourglass icon to display the WSDL panel.
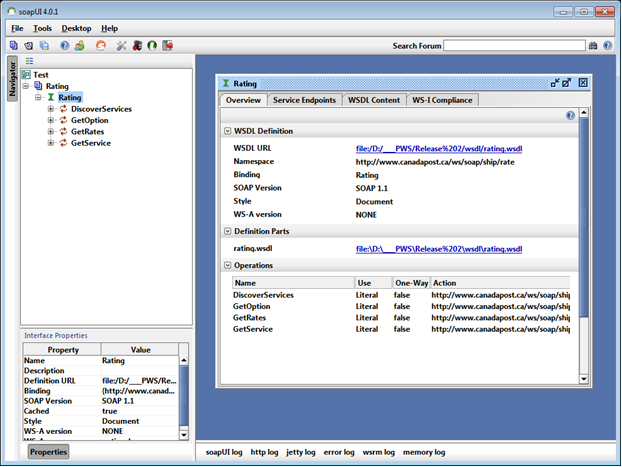
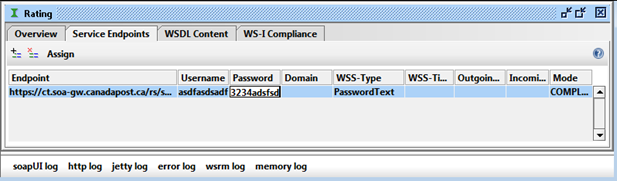
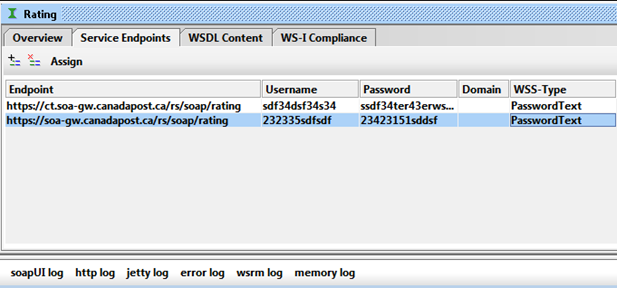
- Select the Service Endpoints tab.
Double-click the cell under Username and enter or paste the first part of your development API key (i.e., the characters before the colon).
Tip: Your API keys will display on the main Canada Post Developer program page when you are signed in.
- Double-click the cell under Password and enter or paste the second part of your development API key (i.e., the characters after the colon).
- Click outside of the cell to save your entries.
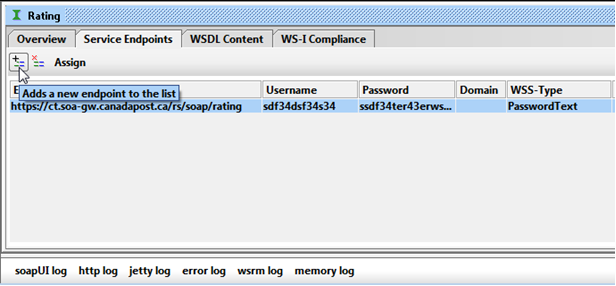
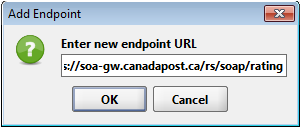
- You may also want to prepare for testing the production endpoint at the same time. To add an endpoint, select the plus (+) button.
Enter the URL for the production endpoint.
Tip: The production endpoint is the same as the test endpoint but without the “ct.”Important: chargeable transactions such as Create Shipment submitted to production from any source including soapUI are subject to billing.
- Next to the production endpoint, enter the username and password segments from your production API key.
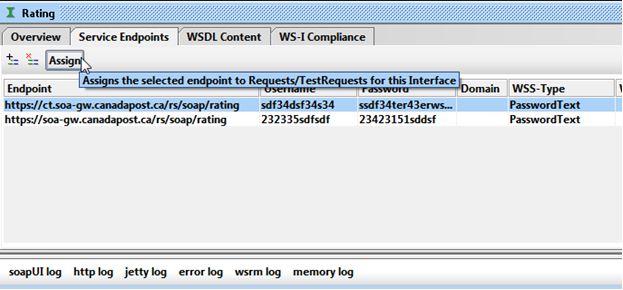
- Select the endpoint you want to use for the sample transactions and then select Assign.
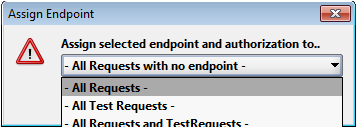
- Choose All Requests.
- In the left pane, expand the operation you want to test until you see Request 1. Double-click Request 1 and then select the green arrow in the right pane to submit the request.
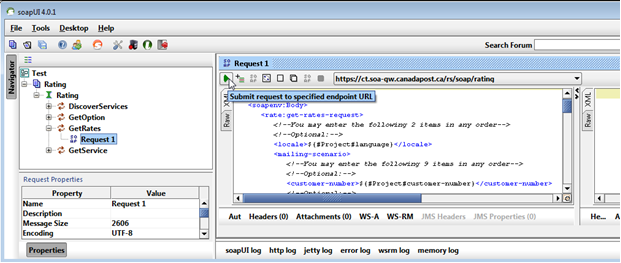
The response appears in the window to the right of the request.

You have now successfully invoked the Canada Post Get Rates web service. Examine the body of the XML response; it provides the names of the eligible shipping services as well as the corresponding prices for each.
You can use the same approach as shown in this example to invoke other Canada Post web services.
Sample request using RESTClient add-on for Firefox
Before you begin: Download the RESTClient add-on for Firefox.
Sending a general REST request
Sign in to the RESTClient add-on for Firefox and enter the following information in the appropriate fields:
- Basic Authorization credentials – the username and password portions of your API key.
- Custom Header values – as shown in the documentation for each web service in the HTTP Headers table (e.g. Accept, Content-Type, Accept-Language).
- Method – as shown in the documentation for each web service in the Endpoint table (e.g. POST, GET, DELETE).
- URL – as shown in the documentation for each web service in the Endpoint table (e.g.
https://ct.soa-gw.canadapost.ca/rs/ship/price). - Request Body – for POST type requests as shown in the documentation for each web service in the Example section.
- Press Send to submit your REST request.
Sending a Transmit Shipments REST request
This sample request is designed for Canada Post commercial customers with a parcel agreement who use contract shipping web services. This section illustrates how to perform an important and final step in the shipping process: a Transmit Shipments web service call.
Transmit Shipments is a mandatory call that sends shipment data for billing and tracking to Canada Post and provides the information in the response that you need to get a manifest (your hard-copy proof of payment required for all shipments for pickup or drop-off to Canada Post).
This example uses the RESTClient add-on for Firefox.
Before you begin: Download the RESTClient add-on for Firefox.
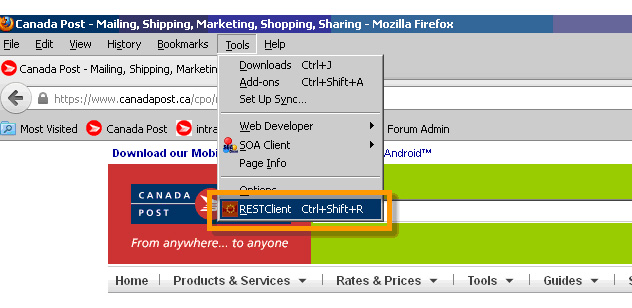
- From the Firefox Tools menu, select the RESTClient add-on for Firefox.
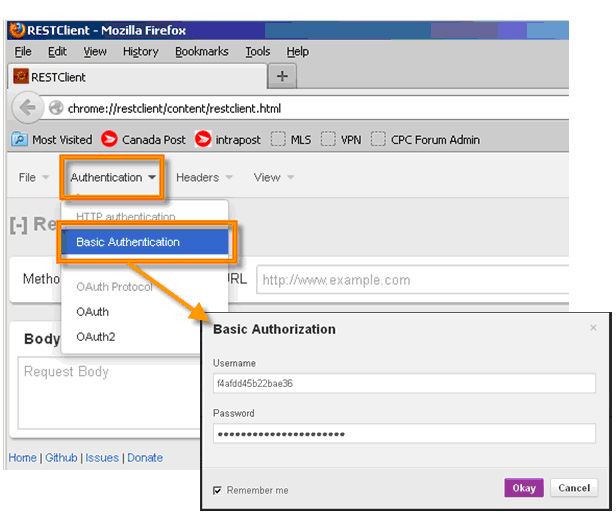
- Select Authentication > Basic Authentication. In the Username field, enter the first portion of your production API key. In the Password field, enter the second portion of your API key. (Your API keys will display when you are signed in to the main Canada Post Developer program page).
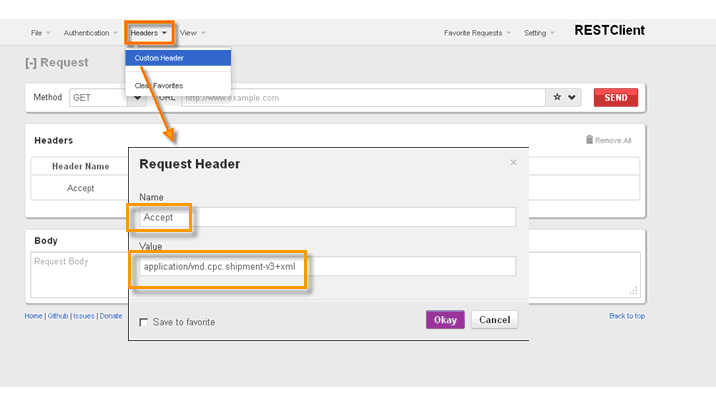
Select Headers > Custom Header. Under Name, enter the name of the HTTP Header variable (e.g. Accept). Under Value, enter the header value as per the documentation in the HTTP Headers table in Transmit Shipments. (e.g., application/vnd.cpc.manifest-v3+xml). Select Okay.
Repeat this step for the Content-Type header (e.g., application/vnd.cpc.manifest-v3+xml). Note: If you would like your response in French, repeat this step one more time and enter the value for the Accept-language header (fr-CA).
- From the Method drop-down list, select POST.
In the URL field, enter the production endpoint for the Transmit Shipments request:
Format: https://XX/rs/{mailed by customer}/{mobo}/manifest
Example: https://soa-gw.canadapost.ca/rs/1234567/1234567/manifestNote: The {mailed by customer} is your 7-digit Canada Post customer number, and the {mobo} is the Mailed On Behalf of Customer number. If you do not mail on behalf of another customer number, simply repeat your 7-digit Canada Post customer number.
Under Body, enter the XML Request Body shown below. Then set the values in the XML according to the table below.
<transmit-set xmlns="http://www.canadapost.ca/ws/manifest-v3">
<group-ids>
<group-id>XXXXXX</group-id>
</group-ids>
<requested-shipping-point>XXXXXX</requested-shipping-point>
<detailed-manifests>true</detailed-manifests>
<method-of-payment>XXXXXX</method-of-payment>
<manifest-address>
<manifest-company>your company</manifest-company>
<manifest-name>XXX</manifest-name>
<phone-number>XXX XXX XXXX</phone-number>
<address-details>
<address-line-1>XXX</address-line-1>
<address-line-2>XXX</address-line-2>
<city>XXX</city>
<prov-state>XX</prov-state>
<country-code>XX</country-code>
<postal-zip-code>X1X1X1</postal-zip-code>
</address-details>
</manifest-address>
<customer-reference>XXX</customer-reference>
</transmit-set>- If you drop off your parcels, use the Postal Code of the deposit location. Not sure what it is? Look it up with Find a Deposit Location.
- If we pick up your shipments, enter the Postal Code of your warehouse/pickup location.
- Select Send to submit your REST request.
- From the response, copy and paste the link rel=“manifest” into the URL field and change the Method to GET.
- From the response, copy and paste the link rel=“artifact” into a web browser. When prompted, enter the username and password portions of your production API key to view your manifest.
- Print the manifest and give it to the driver who picks up your shipments or to the agent where you drop off your shipments.
| Element name | Description |
|---|---|
| group-id | The value you assigned in your Create Shipment request(s) for grouping your shipments. You may have several group IDs, but each transmit shipments request should not contain more than 30 group-ids. If you don’t know your group-id(s), send a REST request to Get Groups to retrieve a list of your group-ids. Find out how to perform a Get Groups sample request. |
| requested-shipping-point | The Postal Code of the location where your parcels are picked up or dropped off. |
| <method-of-payment> | Account or Credit Card. Note: To pay by credit card, you must have a valid default credit card saved in your Canada Post profile. |
| <manifest-company> | Your company name. |
| <manifest-name> | Contact name for the manifest (optional) |
| <phone-number> | Your company telephone number. |
| <address-line-1> | The first line of your address. |
| <address-line-2> | The second line of your address (optional). |
| <city> | The city where your company is located. |
| <prov-state> | The 2-digit code for the province or state where your company is located. |
| <country-code> | CA for Canada or US for United States. |
| <postal-zip-code> | Your Postal Code or ZIP code (Note: Letters in Postal Code must be uppercase, e.g. A8A8A8). |
| <customer-reference> | Your own reference up to 12 characters that will appear on the manifest (optional). |
The links to retrieve your manifest(s) will be returned in the Response.
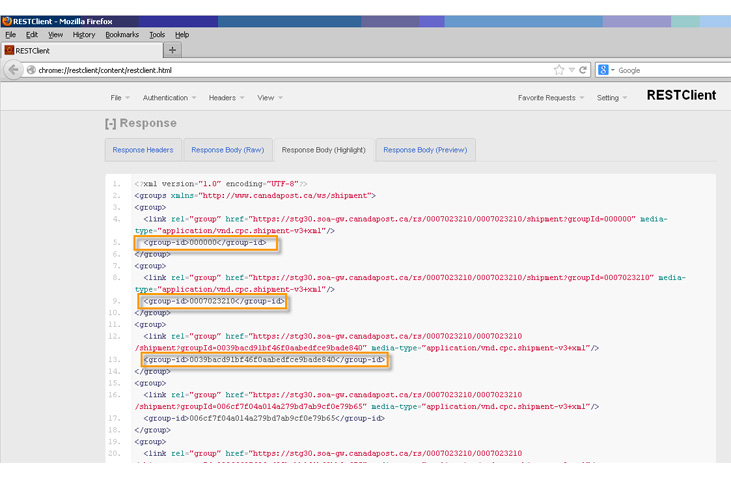
Sending a Get Groups REST request
This sample request is designed for Canada Post commercial customers with a parcel agreement who use contract shipping web services. This section illustrates how to perform a request to the Get Groups web service. Get Groups allows you to retrieve a list of group-ids eligible for submission to a Transmit Shipments request. In order to perform a Transmit Shipments request, you will need to know the group-ids you wish to transmit.
This example uses the RESTClient add-on for Firefox.
Before you begin: Download the RESTClient add-on for Firefox.
- From the Firefox Tools menu, select the RESTClient add-on for Firefox.
- Select Authentication > Basic Authentication. In the Username field, enter the first portion of your production API key. In the Password field, enter the second portion of your API key. (Your API keys will display when you are signed in to the main Canada Post Developer program page).
- Select Headers > Custom Header. Under Name, enter the name of the HTTP Header variable (e.g. Accept). Under Value, enter the header value as per the documentation in the HTTP Headers table in Get Groups. (e.g., application/vnd.cpc.shipment-v3+xml). Select Okay.
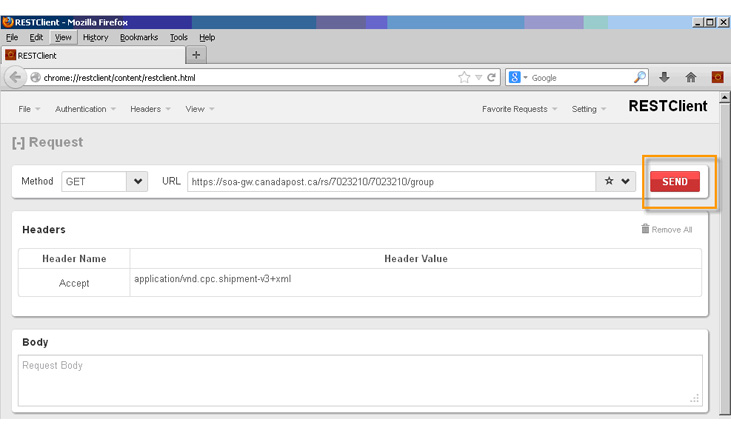
- From the Method drop-down list, select GET.
In the URL field, enter the production endpoint for the Transmit Shipments request:
Format: GET https://XX/rs/{mailed by customer}/{mobo}/group
Example: https://soa-gw.canadapost.ca/rs/1234567/1234567/groupNote: The {mailed by customer} is your 7-digit Canada Post customer number, and the {mobo} is the Mailed On Behalf of Customer number. If you do not mail on behalf of another customer number, simply repeat your 7-digit Canada Post customer number.
- Select Send to submit your REST request.
- To view the response select the tab Response Body (Highlight). All open group-ids for your customer number will be returned.