
Address Book and Groups
Address Book
Creating an Address Book and Address Groups allows you to save time when creating shipments while minimizing data entry errors. If you share a workgroup you are able to share an address book and/or address groups. You can group addresses into Address groups.
When you are creating a shipment you are able to search the address book to populate the Ship To fields. You are also able to easily add Ship To information from your shipments into your address book.
You can sort the entries in your address book by Client Id, Name, Company, Address Line 1, City, Prov./State, Postal Code, Country.
- Select the column header once to sort in ascending order.
- Select the column header twice to sort in descending order.
You are able to:
- Change Address Book Location
- Create New Addresses
- Create Address Groups
- Edit Addresses
- Delete Addresses
- Search Address Book
You can access your Address Book or Address Groups from the navigation panel. ![]()
Change Address Book Location
You are able to change the location of your address book.
During an outage or server disruption, you will not be able to access your address book if you have stored it on the Canada Post server. To use your address book to create shipments during an outage, change its location to store it locally as described below.
- Click on Configuration > Address Book Location
- Click Next and select the location to store your address book
- Follow the directions below if you would like to move your existing address book to the new location.
You can change the location of your Address Book to one of the following locations:
- your local desktop
- the Canada Post server
- an existing external database
If your address book is stored on the Canada Post server, other users in your workgroup can access it. If it is stored on your local desktop, it will only be available to you.
To change the location of your Address Book:
- Export your entire Address Book (right-click on the Address Book and select Export Entire Address Book (all addresses, all groups)).
- Delete your current Address Book* (right-click on Address Book and select Delete entire book (all addresses, all groups)).
- Repeat steps 1 and 2 for all Mailed on Behalf of Customers if you have more than one.
- From the menu, select Configuration > Address Book Location.
- Click Next and select the new location for your Address Book.
- Click Finish.
- Recreate your Address Groups (right-click on Address Book and select Address Group).
- Select menu File > Import > Import Addresses to import your Address Book (including all Address Groups).
* Note: Do not complete step 2 to delete your current address book if you want to keep a copy in the current location. Remember to make updates to both address books (if you are maintaining one on the server and one locally) when address changes occur.
Accessing an external Address Book from the EST Desktop
Pre-requisites
- Only Oracle databases are currently supported
- The Desktop must be capable to access the database (i.e. network, security)
Instructions
- Setup a View in your existing database that matches the schema in the file below, or create tables using these sql statements if you are creating a database for this purpose address_book.sql
- Configure your external Address Book in the Desktop using menu Configuration > Address Book Location (Note: menu is only visible when Service Type is Shipping)
Below is an example; these jdbc parameters must be obtained from a database administrator.
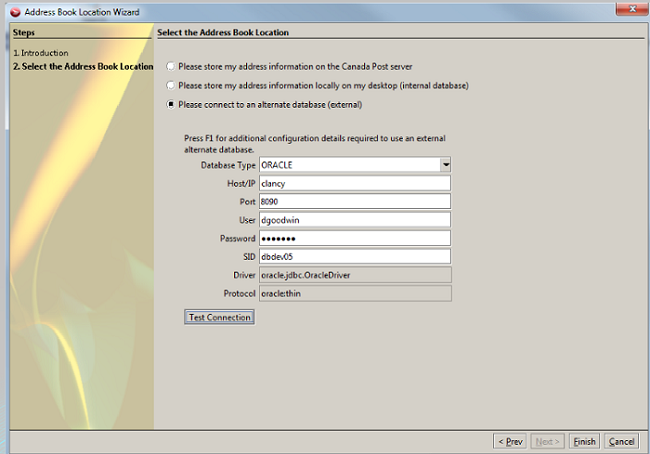
- That’s it; you retrieve addresses from your external Address Book as usual while you are shipping, noting that you cannot update your Address Book using the Desktop though.
Create New Address
You are able to create and add an address to the EST Business Desktop 2.0 Address Book.
- Open Address window: you are able to do this numerous ways:
From Menu
- Open File menu
- Select New
- Select Address
From Navigation panel
- Select Address Book
- Click New icon

From New Shipment screen – Ship To
- Click Save this Address icon <insert pic “save this address icon”>
- Enter Address details
- Client Id: maximum 30 alphanumeric.
Client Id is for your reference and can be used as a search term
- Name: maximum 44 alphanumeric.
If this data has been converted from existing VCD data it will merge salutation, first name and last name in one field.
- Company: maximum 44 alphanumeric
- Add’l Information: maximum 44 alphanumeric
- Address Line 1: maximum 44 alphanumeric
- Address Line 2: maximum 44 alphanumeric
- City: maximum 40 alphanumeric
- Country: maximum 40 alphanumeric
Can also use the two character country code
Can select from drop-down list
- Province/State: maximum 20 alphanumeric
Can also use the two character Province or State code
Can select from drop-down list
- Postal Code/Zip Code: format A9A 9A9 for Canada
USA format 99999-9999 (the last 4 digits are optional)
Maximum 14 alphanumeric for other countries
- Contact Phone: 25 alphanumeric
- Tax ID/IRS/VAT: maximum 18 alphanumeric
This is disabled when country is Canada
- Primary Email: maximum 70 alphanumeric
Must be in valid email format (i.e. abc@email.com)
- Secondary Email: maximum 70 alphanumeric
Must be in valid email format (i.e. abc@email.com)
- Select Belongs to Address Group(s) if applicable
If Address Groups have been created they will display under Belongs to Address Group(s)
If this new address was created from an address group the address group will automatically be selected
Address may belong to more than one address group, however the address data is stored at the address book level, not the group level. This means you will only have to edit or delete the address information from one location.
- Close the Address screen by clicking on the Close icon

- Confirm changes
Edit New Address
You are able to edit addresses to add or modify information saved. If an address is part of one or more groups you will only have to edit once and all address groups will be updated with the new information.
- Open address to edit: use search to find the address requiring editing
- Address populates and you are able to edit as required (or double-click from list of addresses)
- Save your changes by clicking on the Save Address icon, or
- Close the Address screen by clicking on the Close icon
- Confirm changes
Delete New Address
You are able to delete individual addresses. Deleting will remove them from all Address Groups they are associated with.
- Select address to delete: use search to find the address you wish to delete
- Click Delete: you are able to do this two ways
Click Delete icon from the toolbar 
OR
Right-click and select Delete
The address is deleted and is no longer available from the address book or from any address book group.
You are also able to:
Bulk Delete all addresses in a book.
Search Address Book
Search address book enables you to easily find an address either for editing, deleting or to use to populate a shipping Ship To section.
- Click on Address Book or an Address Group
- Enter search term beside Search in the Toolbar
 : or leave blank to return all addresses in selected folder
Search terms include Client ID, Name, Company, Additional Info, Address Line 1, Line 2, City, Postal/ZIP, Phone, Tax Id, State/Province and Country
(Codes must be provided as search criteria), Primary email, Secondary email.
You are able to narrow your search results by entering more than one search term (you do not need to use commas to separate terms).
- Click Search
- View Addresses displays with the following information:
- Number of Addresses: displays in the top right corner

- Address information including: Client ID, Name, Company, Address line 1, City, Prov/State, Postal Code/ZIP code, Country
Note: Search term: “Will” returns the following matches:
- William Jones (in name field)
- John Williams (in name field)
- Williamsburg (in City field)
- 123 William Street (in Address line 1)
Next Steps:
Select an Address to Edit, Delete or Ship To in a new shipment
Address Groups
You are able to manage your addresses by creating Address Groups. An Address Book entry can be attached to one or more Address Groups. Address Groups are accessible by everyone in your workgroup.
Create New Address Group
1. Open Create Address Book
From Menu
- Open File menu
- Select New
- Select Address Group
From Navigation panel
- Select Address Book, or any existing Address Group
- Right-click, select Address Group
2. Enter Address Group Name: maximum 80 alphanumeric
3. Click OK and new address book group is added to the navigation panel
Add Addresses to Group
You can add multiple addresses at a time to an Address Group. You must create an Address Group before you can add addresses to it.
- In the left pane, select Address Book.
- In the right pane, Ctrl+Click or Shift+Click to select the addresses you wish to add to a Group.
- Right-click the selected addresses and select Add to Group and then select the name of the Group you wish to add them to.
- Click OK.
Rename Address Group
You are able to rename an address group if required.
1. Select Address Group you wish to rename
2. Right-click and select Rename Address Group
3. Enter the new name in the Address Group Name: maximum 80 alphanumeric
4. Click OK
Delete Address Group
There are three types of delete associated with the address group.
- Delete an Address Group while leaving all addresses associated with it intact and available in the root Address Book.
- Delete all addresses in a group: this deletes all addresses in this group only. They will remain intact in the root Address Book .
- Delete entire address book (all addresses, all groups): this deletes everything. You will be left with an empty Address Book folder.
Delete an Address Group
1. Select the Address Group you wish to delete
2. Right-click and select Delete Address Group
3. Confirm the Address Group Name you wish to delete
Delete all addresses in a group
1. Select the Address Group you wish to delete
2. Right-click and select Delete all Addresses in this Group
3. Click Delete to confirm: the confirmation message displays the number of addresses that will be deleted
Note: When deleting all addresses in a group, the address group will remain
Delete entire address book (all addresses, all groups)
1. Select Address Book or any Address Book in the navigation panel
2. Right-click and select Delete entire address book (all addresses, all groups)
3. Confirm that you wish to delete all addresses: this will clear everything and leave an empty Address Book in the navigation panel.
Warning: this will delete All addresses – not only addresses in one group.
- Click Cancel if you do not wish to continue.
- Click Delete to confirm.
Bulk Processing from Address Group
To save time you are able to create Bulk Shipments from an address group.
1. Select the required Address Group from the navigation panel ![]()
2. Right-click and select Bulk Shipment
3. The Address Bulk Shipment opens
4. Choose the Destination:
- Import File into New Folder: enter name of new folder
- Import into Existing Folder: select existing folder from drop-down list
5. Click Next
6. Choose what you would like to do with the new shipment
- Save
- Save as Draft
- Print: when selected you will then select, from the drop-down list, the order to print by: Original, Client Id, Country, Name, Order/Item Id, Postal/Zip Code
Choosing Save and clicking Bulk Edit:
7. The Bulk Edit screen opens where you will enter the required:
- Parcel, Service and Payment information
- Customs (if required)
- Other Shipment Settings (if required)
8. Click Apply when complete
9. You will return to Edit Address Bulk Shipments where you can click Next
10. Summary displays the Address Bulk Edit progress bar:
You have the option of clicking Background to allow this to continue processing while you continue working.
When complete the Task Results will display.
Choosing Save As Draft and clicking Bulk Edit:
7. Summary displays the Address Bulk Edit progress bar:
You have the option of clicking Background to allow this to continue processing while you continue working.
When complete the Task Results will display.
Note: When saving as draft other users in your workgroup will not be able to access these.
Next Steps:
View Shipping Folders to see the shipments you just created.
