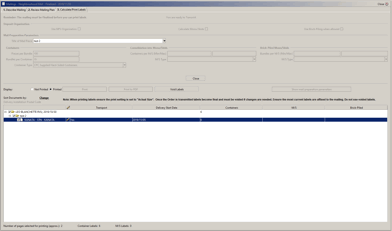
Print Manager
Once your mail has been Finalized you are able to select the Delivery Installations you wish to print or void if required.

Display: select what you wish to display:
- Not-Printed: select to display all Not-Printed labels. If there are no Not-Printed labels the table will remain empty.
- Printed: select to display all Printed labels. If there are no Printed labels the table will remain empty.
Show mail preparation parameters: select to expand and show the details. Most of the information shown is display only. You will be able to select a different Title of Mail Piece if required. Click Close if you wish to close this section and allow more screen space for the Print Manager Table.
Print Manager Table
In the Print Manager Table, you can select the deposit location, the title of the mail piece, and can drill down to the delivery installation level if required.
The table displays:
- Title of Mailing Piece: you are able to expand
 / contract
  to see the individual Delivery Installation levels.
 - Transport
- Delivery Start Date
- Containers
- M/S
- Brick-Piled
Edit ![]() : Select this to override a single Delivery Installation
: Select this to override a single Delivery Installation
The number of pages selected for printing (approx.), Container labels and M/S labels will be displayed along the bottom and will update based on your selection.
To Print:
- Select Not-Printed to Display
- Select the line(s) you wish to print. You can select the deposit location, the title of the mail piece, and can drill down to the delivery installation level if required.

- Click Print and the required labels will print. To change your printer setting please see the help topic: Device Configurations>Printers
- Click Print to PDF and you can save the PDF image of your labels to your local drive and print at a later time.
Note: If NPS Presort was selected the container labels will print in the sequence that is on the NPS Report.
To Void:
If you have printed labels but have found there are modifications that are needed and you haven�t transmitted (only Finalized) you are able to Undo Finalize, make modifications and Void already printed labels. By Voiding the labels you are able to print the new modified label.
- Select Printed to Display
- Select the line(s) you wish to void. You can select the deposit location, the title of the mail piece, and can drill down to the delivery installation level if required.

- Click OK when you are warned that the selected Delivery Installations will be returned to a Not-printed status and you will have to re-print the paperwork and re-label your containers.
- The table will be updated; the labels you voided will not display here, they will now display when you select Not-Printed.
Next Steps:
Transmit
End of Day


