
Menu - File

Only applicable menus will be available. Menus not relevant will not be shown.
New
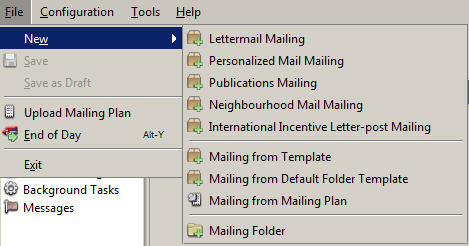
You are able to create a new mailing:
- Select New
- Select from the available options:
- Lettermail Mailing
- Personalized Mail Mailing
- Publications Mailing
- Neighbourhood Mail Mailing
- International Incentive Letter-post Mailing
- Mailing from Template
- Mailing from Default Folder Template
- Mailing from Mailing Plan
- Mailing Folder
- The appropriate screen will open
Save
You are able to save your mailing data if necessary before printing and processing. Saving will validate your mailing. Once the Business Desktop 2.0 has performed a validation you will see either the ![]() or
or ![]() in the Mailing Pieces Table.
in the Mailing Pieces Table.
To Save:
- open the File menu from the main menu
- select Save
- continue working or close
You are able to edit this at a later time by searching and selecting from your shipment list.
Save as Draft
You are able to save your mailing data as a draft if necessary before printing and processing. This saves the data temporarily in your own database on your workstation. If you are working offline and a connection to the Canada Post servers cannot be established you are able to save as draft and can update and finalize at a later time.
To save as a draft:
- open the File menu from the main menu
- select Save as Draft
- continue working or close
You are able to edit this at a later time by searching and selecting from your shipment list.
Important: Save as Draft saves your work locally only. If you share a workgroup, other users in your workgroup will not be able to access any Save as Draft.
Upload Mailing Plan
There are two steps to be completed when you wish to use a Presort Mailing Plan (SERP Mailing Plan).
Step 1: Upload Mailing Plan
Upload the Mailing Plan to CPC servers for immediate or future use.
Step 2: Import file
Once successfully uploaded you are able to Import and apply the mailing plan to an existing mailing or create a new mailing from the uploaded mailing plan.
Upload Mailing Plan:
The Business Desktop 2.0 step-by-step wizard will guide you through the process. Current XML and zipped file formats are supported.
- Select Upload Mailing Plan from the File menu
- Upload Mailing Plan wizard opens
- Select one or more Presort Mailing Plan files for upload.
- Browse to select the appropriate file(s). To upload more than one file, Ctrl+Click the files you wish to upload.
-
Ensure Files of Type is set to the correct type:
- XML Files: If you have Presort Mailing Plan XML file(s). Both XML files and XML files compressed into a ZIP file are accepted.
- CSV or txt: If you have Presort Mailing Plan comma-delimited or text files, you must upload them as a ZIP file.
- Click Next

NOTE: If a SERP Mailing Plan has previously been uploaded and has been applied to a mailing you will not be able to upload it again. You will receive an error message and you will need to select a different file to upload. If a SERP Mailing Plan has previously been uploaded but the mailing has been deleted you will be able to import the SERP Mailing Plan to use again. Once it has been transmitted it cannot be used again.
- Click Finish
A Progress bar displays and you have the option to:- Move the task to the Background
 The Upload Mailing Plan Wizard closes and the upload runs in the Background. You are able to view Background Tasks from the navigation section.
 - Stop
 stop the import process before it has run to completion.
 - Wait until the task finishes
- Move the task to the Background
- Task Results displays a successful message
Next Steps:
Create New from a Mailing Plan
Or Import
Preview
![]()
All items shipped by Canada Post must be accompanied by a paper Statement of Mailing. The corresponding electronic data from this Statement of Mailing must be transmitted prior to induction.
The SOM preview is for review and correctional purposes only. It does not replace the Statement of Mailing, which must accompany your mailing to a Canada Post induction site. Click Transmit to CPC to automatically save and finalize the mailing. Once transmitted, the Canada Post logo will appear at the top left and SOM number will appear at the top right. This printed document must accompany the mailing.
The electronic SOM must be transmitted to Canada Post prior to induction. Failure to follow this process may result in a surcharge.
In order to avoid delays in processing, a printed copy of the SOM must accompany the 1st drop-off of the mailing.
End of Day
![]()
In order to induct your mailings into Canada Post you must provide the appropriate paperwork with your mailing. The End of Day process allows you to select the mailings ready and post them to a Statement of Mailing (SOM) to be submitted with your mailing at End of Day.
Note: End of Day does not mean you cannot process additional mailings. If you find you have additional shipments ready for Canada Post you are able to process more than one End of Day. This means you can get those mailings out today and not have to wait until tomorrow.
- Press End of Day
- End of Day displays mailings available for processing
You are able to select only the mailings that are ready and select the address to appear on the manifest from here.
From here you can view:
- Customers : if applicable, lists all mailed by customers on the left side of the screen with the mailings that are ready to be reconciled (on the right)
- Statements of Mailings : displays the generated Statements of Mailings and their attributes
- Address on manifest
- Mono / Skid Counts
- Select Customer if applicable: mailed on behalf of customers with mailings ready for induction will display in the left navigation panel.
- This panel will not display when there is only one mailed by customer.
- You will have to select each customer to reconcile their mailings.
- Select Statement of Mailings ready to reconcile
Note: If you are not ready to transmit this Statement of Mailing you are able to click Skip.
- Select Address on Statement of Mailing from list: use Customer address or use Site address if available
- Enter Mono / Skid Counts, if required
- Enter Credit Card Details: if required
- Click Transmit

- If Transmit is successful the End of Day screen closes
- If more than one Mailed on Behalf of Customer are being processed, the End of Day will remain open allowing you to Transmit all Statements of Mailings for all customers
- If unsuccessful an error message displays
- Transmitted Statements of Mailings can be viewed in the History section
- Select Customer if applicable: mailed on behalf of customers with mailings ready for induction will display in the left navigation panel.
Next Step: History
Exit
Exit closes the Business Desktop 2.0, if any changes were made but not saved you will be asked "Do you want to save changes?" before closing.
