
Mailing Preferences
Preferences specific to Mailings can be set for:
- Billing Information
- Defaults for Output
Billing Information
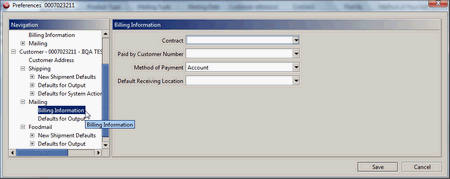
Here you are able to set billing information defaults to pre-populate fields when creating a new mailing, eliminating keystrokes and saving time.
- Select the billing information you wish to use as a default:
- Contract : all available contracts for the current behalf of customer will be available for selection
- Paid by Customer Number : all your available paid by customer numbers will be available for selection.
- Method of Payment : payment methods are based on your customer number and may include account, credit card and meter.
- Default Receiving Location : all eligible receiving locations will be available.
- Click Save
You may change any of these defaults from within the order if required.
Note: at any time you can click Cancel before completing an action.
Defaults for Output
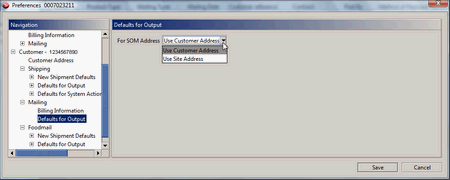
Here you are able to set printing defaults for SOM address.
- Select the From Address you wish to use:
- Use Customer Address : this is the address associated with your customer number. This may have been imported with data from a previous EST Desktop VCD.
- Use Site Address : this is the address associated with the location of this EST Business Desktop 2.0 installation. This may have been imported with data from a previous EST Desktop VCD.
- To print only 2 copies of the manifest instead of 3, select Do not print the Customer Copy.
- Click Save
You may change any of these defaults from within the order if required.
Note: at any time you can click Cancel before completing an action.
Registered Mail
Defaults for New Items
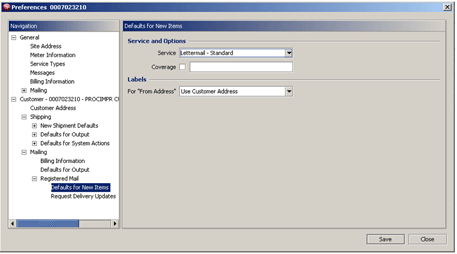
- Service and Options
- In the Service drop-down list, select Lettermail - Standard or Lettermail - Other.
- If you would like coverage for loss or damage, select the Coverage checkbox.
Note: Registered Mail includes $100 of coverage. If you would like to purchase additional coverage, enter the total amount of coverage you want, including the $100 coverage included with the service.
- In the For From Address drop-down list, select the type of �from address� you want to use:
- Use Customer Address: this is the address associated with your customer number.
- Use Site Address: this is the address associated with the location of your EST 2.0 installation.
- Do Not Print: select this if you use envelopes that already contain your from address.
- Select Save.
You may change any of these defaults from within the order as required. Note: at any time you can select Close before completing an action.
Read more about Registered Mail in the Postal Guide.
Request Delivery Updates
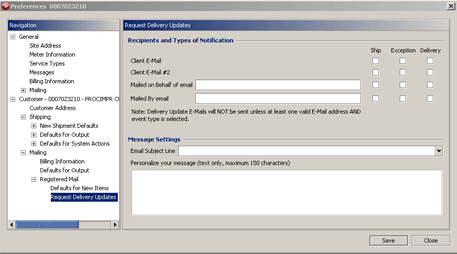
A delivery update is an email notification that informs you of the status of an item you want to track. It is a free option available when you purchase a bar-coded service.
- Under Recipients and Types of Notification, your Client E-Mail and Client E-mail #2 appear by default (anytime you update these addresses in the shipping window, your email notifications will be updated accordingly).
You have the option to enter email addresses for Mailed on Behalf of and Mailed By (any addresses you enter here have no impact on the data on your shipping window).
For each email address, select one or more events you want to receive notifications for:
- Ship - When the shipment order is created and the item is provided to Canada Post for delivery.
- Exception - When a delivery interruption occurs, including Return to Sender
- Delivery - When an item is delivered, carded for pickup at a local Post Office and/or when a signature image or signatory name is available to view online.
- From the Email Subject Line drop-down list, select one of the following options to appear in the subject lines of your email notifications:
- Tracking Number
- Reference #
- Additional Reference #
- In the text box, you can enter a personalized message up to 150 characters. This message will appear in the body of your email notifications.
- Click Save.
You may change any of these defaults from within the order as required.
Note: at any time you can click Close before completing an action.
