History
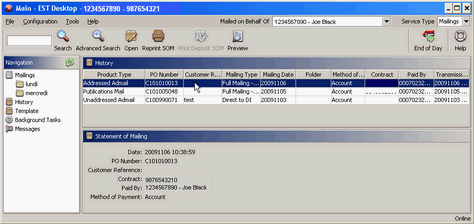
History displays all reconciled mailings that have been successfully processed in the End of Day.
You can sort the mailings in your History list based on any of the following criteria:
Product Type, PO Number, Customer Reference, Mailed on Behalf of, Mailing Date, and Paid By
- Select the column header once to sort in ascending order.
- Select the column header twice to sort in descending order.
From here you are able to:
- Search and Open or Preview details of a reconciled mailing
- Reprint SOM
- Print Deposit SOM
- Print Distribution Plan - Summary
- Print Distribution Plan - Detailed
- Preview
Void Transmitted Mailing
Right-click on the SOM in the History screen and select Void Mailing.
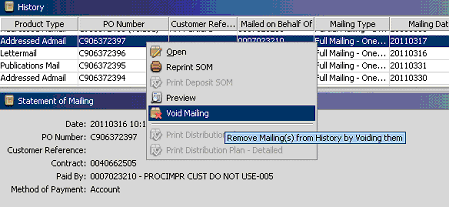
Note: Voiding a mailing will allow you to re-import it if you need to correct any errors and re-transmit.
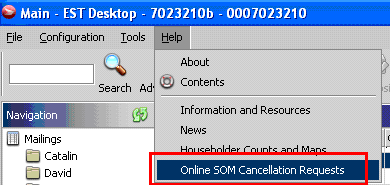
Important: After you void a mailing, be sure to send a SOM Cancellation Request to Canada Post or you will be billed for the transmitted SOM.
To send a cancellation request, from the Help menu in EST 2.0, select Online SOM Cancellation Requests.
Search and View details:
- Click History in navigation panel

- Click the Search icon to display all Shipments and Manifests, or
- Enter Search term: maximum 70 alphanumeric or click Advanced Search
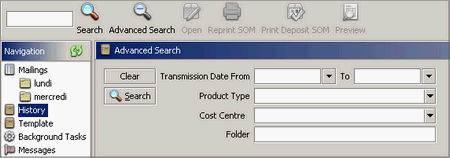
- Enter one or more search terms:
- select Transmission Date From and To
- select Product Type
- select Cost Centre
- Enter folder name
- Select Mailed on Behalf Of
- Click Search:

- Search results will display. If no shipments are found you will need to enter a different search value
- View History will display as read-only

- Select a mailing
- You are able to Open, Reprint SOM, Print Deposit SOM (if applicable) or Preview
- Double-click a specific mailing to view details
- When you have Opened, Reprinted, Printed or Previewed a Mailing the Statement of Mailing for that specific mailing displays.
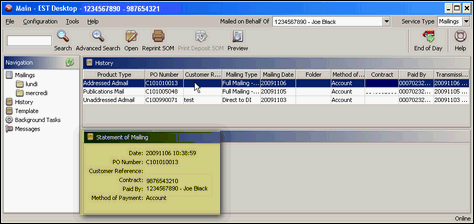
Reprint
- Select one or more SOMs
- Right-click and select Reprint SOM:
- You are also able to select Reprint SOM from the menu
- The reprinted SOM will display a reprint watermark
- If only one manifest was selected, the manifest will be sent to the printer as a single print job
- If multiple SOMs are selected they will be sent to the printer as multiple print jobs
Export history
You can export your shipment history to XML or text format.
Export history to XML format
- In the Navigation pane, right-click History and select Export History.
- Enter the start date and end date of the time period you want your shipping history exported. Use the date format yyyy/mm/dd or select a date from the calendar in the drop-down list.
Note:
In shipping mode, these dates refer to the dates you transmitted your Manifests to Canada Post.
In mailing mode, these dates refer to mailing dates.
- Select either ALL Mailed on Behalf of Customers or a specific customer to export.
- Ensure the File Format selected is XML.
- In the Output File field, enter a file path and file name for this export document. You can select the file chooser icon
 to browse to the location where you want to save the file.
 - Click Apply.
- The History Export Summary displays:
- Total number of records exported.
- File path and file name for the exported history.
- Click Close.
Export history to text format
- In the Navigation pane, right-click History and select Export History.
- Enter the start date and end date of the time period you want your shipping history exported. Use the date format yyyy/mm/dd or select a date from the calendar in the drop-down list.
- Select either ALL Mailed on Behalf of Customers or a specific customer to export.
- Ensure the File Format selected is Text.
Note:
In shipping mode, these dates refer to the dates you transmitted your Manifests to Canada Post.
In mailing mode, these dates refer to mailing dates.
In the Output Folder field, enter the file path to the location where you want to save the file. Or you can select the file chooser icon  to browse to the desired location.
- In the Suffix field, enter the filename suffix you wish to use.
- Click Apply.
- The History Export Summary displays:
- Total number of records exported.
- File path to the exported history.
- Click Close.
Status Bar

The status bar displays the number of mailings in each state.
States displayed are as follows:
- Draft: the number of mailings stored locally that were specifically Saved as draft. There are no distinctions between Save as draft orders that passed validation and orders that have not passed validation
- Incomplete: the number of mailings that are saved and did not pass validations (missing or incorrect field information)
- Accepted: these mailings are ready to be printed. They have passed validation and are saved.
- Finalized: the number of mailings that are finalized. They have passed validation and are saved.
- In Progress: the number of mailings that are pending a system process. (i.e. mailing has been saved but has not been validated, or a bulk process is underway or a print request has been made but has not yet completed)
Refresh the counts by clicking on the refresh icon.
Shipping Search
Search shipments enables you to easily find a shipment either for editing, deleting or processing.
- Click on Shipment or a Shipment folder
- Enter search term beside Search in the Toolbar
 or leave blank to return all shipments in selected folder
Searches are conducted against the following shipment fields:
Name, Company, Additional Info, Address Line 1, Address Line 2, City, Postal/ZIP, Contact Phone, Tax id, State/Province and Country (as codes only), Client e-mail #1, #2, cost centre, Item reference #2, pin number (if shipment is printed).
Note: Search in Order ID initiates a search in local files and/or pending shipments. More information on searching local files is below.
Enter more than one search term (you do not need to use commas to separate terms) to narrow your search results.
- Click Search
- Shipment list displays with the following information:
- Status Bar: shows the number of shipments at each status

- Shipment status: the current status of each shipment since the last search request
- Order Id: the user-entered or imported order Id
- To: name of the receiver (Ship To)
- Item: parcel dimensions and weight
- Service: selected service
- PIN Number
- Options: all options selected
Sorted shipments will be displayed in the reverse order of entry, i.e. the first file written from a source file will be displayed at the bottom of the list with the most recent displayed at the top of the list.
Note: Search term: "Will" returns the following matches:
- William Jones (in name field)
- John Williams (in name field)
- Williamsburg (in City field)
- 123 William Street (in Address line 1)
Next Steps:
Select a shipment to Edit, Delete or Process
Local Files
You are able to search for files saved locally if the following conditions are first met:
- Each file must contain only 1 individual Format 2 order
- Each file name must be identical to the value of the Order ID field within it (i.e. if the Format 2 file has �1234� in the order ID field (field #2), the file name must be 1234.txt or 1234.csv
- The following modification must be brought to the desktop properties file: Order.search.dir=D:/Name of directory (where "Name of directory" is the name of the directory where the individual format 2 files are stored. Notice the direction of the forward slash as well here). The path can be any path on your PC.
- At this time, only Format 2 file types are supported, therefore, the first character in the import file must be 2.
For example: The following is a sample shipment file saved as "3333.txt." in the directory stated in the desktop properties file with Order ID "3333" .
2,"3333","143","","JOE","BLACK","","ABC COMPANY","Order Ref 334","123 Main Street","Suite 344","Toronto","ON","M5T3D4","CA","TEL 123-456-7890","FAX 999-999-9999","J.Black@email.com","500"
- You are now ready to search for a local file
Perform a search against Order ID from the New Shipment screen.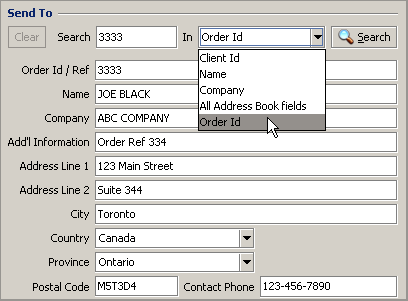
- The matching file will populate
Refresh the counts by clicking on the refresh icon.
Send to
The Send To section captures information about the receiver of this shipment.
Fields highlighted in yellow are mandatory and cannot be left blank.
- Click Clear if necessary to clear all fields: some fields may be populated with values retained from a previous shipment .
- Enter required information :
- Order Id / Ref : optional (maximum 30 alphanumeric)
This field may be used as an alternate search key when tracking a package. - Name : optional (maximum 44 alphanumeric)
- Company : optional (maximum 44 alphanumeric)
- Addl Information : optional (maximum 44 alphanumeric)
- Address Line 1 : mandatory (maximum 44 alphanumeric)
- Address Line 2 : optional (maximum 44 alphanumeric)
- City : select from drop-down list
- Country : maximum 40 alphanumeric
Can also use the two character country code
Can select from drop-down list - Province/State : maximum 20 alphanumeric
Can also use the two character Province or State code
Can select from drop-down list - Postal Code/Zip Code : format A9A 9A9 for Canada
USA format 99999-9999 (the last 4 digits are optional)
Maximum 14 alphanumeric for other countries - Contact Phone : 25 alphanumeric
This may be used to follow up on shipment delivery. - Tax ID/IRS/VAT : maximum 18 alphanumeric
This is disabled when country is Canada
Selecting an address from a search of your Address Books or Local Files (triggered from the first field in the Send To section ) can also populate the above information
Next Step:
Complete From section.
Search
You are able to populate the Ship To section with information from your address books or local files by using the Search.
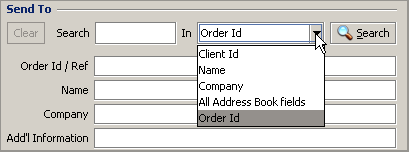
- Enter a search term in the Search field:
- Client ID
- Name
- Company
- All Address Book fields
- Order ID
- Note: Search in Order ID initiates a search in local files and/or pending shipments. See more information on searching local files.
- Click Search
- Fields will automatically populate with the match (if there is only one match)
- You will be asked to select a client
- Click OK or Cancel
- The Ship To fields will populate on the New Shipment screen with the selected match
If multiple matches are found the results will display.
If no matches are found you will be asked to select different criteria.
Search History
History displays all reconciled shipments shipments that have been successfully processed in the End of Day.
From here you are able to:
- Search and View details of a reconciled shipment
- Reprint Manifest
Search and View details:
- Click History in navigation panel

- Click the Search icon to display all Shipments and Manifests, or
- Enter Search term: maximum 70 alphanumeric
- Name, Company, Additional info, Address line 1, Address line 2, City, Postal/Zip Code, Phone, Tax ID
- State/province and Country
- Other fields: Client email, cost centre, reference #1, reference #2, pin number (tracking number)
- Or leave the search field empty to return all reconciled shipments
- or click Advanced Search

Enter Search term:- Transmission Date From and To
- Name
- Country
- Service
- Folder
- Order ID/Ref
- Company
- Province
- Cost Centre
- Click Search:

- Search results will display in the shipments and manifests
- If no shipments are found you will need to enter a different search value
- If more than 4000 shipments are found you will need to refine your search
- Double-click a specific shipment to view details
- View Shipment History will display as read-only
- Click on close
 to close the View Shipment Details screen
Reprint:
- Select one or more manifests
- Right-click and select Reprint manifest:
- You are also able to select Reprint Manifest from the menu

- You are also able to select Reprint Manifest from the menu
- The reprinted manifest will display a reprint watermark
- If only one manifest was selected, the manifest will be sent to the printer as a single print job
- If multiple manifests are selected they will be sent to the printer as multiple print jobs
Track from History
- Click History in navigation panel

- Click the Search icon to display all Shipments and Manifests, or
- Enter Search term: maximum 70 alphanumeric
- Name, Company, Additional info, Address line 1, Address line 2, City, Postal/Zip Code, Phone, Tax ID
- State/province and Country
- Other fields: Client email, cost centre, reference #1, reference #2, pin number (tracking number)
- Or leave the search field empty to return all reconciled shipments
- or click Advanced Search

Enter Search term:- Transmission Date From and To
- Name
- Country
- Service
- Folder
- Order ID/Ref
- Company
- Province
- Cost Centre
- Click Search:

- Search results will display in the shipments and manifests
- If no shipments are found you will need to enter a different search value
- If more than 4000 shipments are found you will need to refine your search
- Select a shipment
- Right-click and select Track a package
- You are also able to select Track a package from the menu

- You are also able to select Track a package from the menu
- Track a Package opens
Track is our online tool that provides you with tracking information and delivery confirmation for your packages.
You should be aware that there may be a time delay between when scanning events happen on your item and when you receive the tracking information. Canada Post's tracking system is updated daily. However, it is possible that tracking information is not available if the item was mailed recently. For example, this can be common in rural locations or when information is coming from foreign postal administrations.
Shipment selection
You are able to select only the shipments that are ready, change the deposit location and select the address to appear on the manifest from here.
From here you can view:
- Customers : if applicable, lists all mailed by customers on the left side of the screen with the manifests that are ready to be reconciled (on the right)
- Select the shipments to reconcile : this displays the Shipment Folder and the number of shipments in that folder that are ready to be reconciled.
- Manifests : displays the generated manifests and their attributes
- Address on manifest
- Select Customer if applicable: mailed on behalf of customers with shipments ready for induction will display in the left navigation panel.
- This panel will not display when there is only one mailed by customer.
- You will have to select each customer to reconcile their shipments
- Select Shipment Folders ready to reconcile: select all that are ready
- Selecting or deselecting a shipment folder enables the Refresh Manifest button
- Press Refresh Manifest, if required, to refresh the Manifests listed
- Select Manifests: all manifests will be pre-selected based on the shipment folders selected
- You are able to de-select if required
- Order Type: the service selected
- # Shipments: this is the number of shipments based on the shipment folders selected (this number will refresh when you have selected or deselected shipment folders and clicked Refresh manifests)
- Contract and Paid By will display for each manifest
- Method of payment: displays
- Deposit Location: displays
- CIF: will display if required
- Customer Reference Number: you are able to edit this by clicking on the edit icon <insert edit icon>
- Select Deposit Location: click the edit icon <insert pic edit icon> if required
- Enter Credit card Details: if required
- Select Address on manifest from list: use Customer address or use Site address if available
- Click Transmit/Print
- Click Generate a Preview Manifest if required
- Preview Manifest generated as PDF file and displayed through Adobe Acrobat (or any PDF software used by customer).
- Can be printed, saved or emailed using the features of the user's PDF software.
- Preview Manifest will have "Preview" notation and no Manifest number
- Only one manifest at a time can be previewed
- If Transmit/Print is successful the End of Day screen closes
- If more than one Mailed on Behalf of Customer are being processed, the End of Day will remain open allowing you to Transmit/Print all manifests for all customers
- If unsuccessful an error message displays
List displays:
If Credit Card you will be required to Enter Credit Card Details
Data Maintenance Favourite Post Office open and you are able to edit as required.
Note: If you have a Shipment in a Shipment Folder that is not ready to be reconciled you have the option of Deleting or Moving the shipment from the Shipment Folder before completing the End of Day process.
Next Step:
History


